If you want to create elaborated print products (folders, brochures) or design manuals, your editing software should support multiple pages. The Adobe Illustrator CS family has this important feature already integrated (working with multiple artboards), together with a flawless export to PDF, in Inkscape you will need to implement multiple page support manually.
In order to work with multiple pages in Inkscape, you'll need to download and install an additional plugin: Inkscape multiple pages support (currently in a very stable beta version inkscape-pages-1.2.1.exe)
The plugin will add extra features to your Inkscape installation, for instance:
- insert pages
- use a master page
- rearrange and remove pages
- navigate through pages
- export to PDF
Download and install
Download the plugin from http://sourceforge.net/projects/inkscape-pages.

Run the installer file (*.exe), usually it will detect your current Inkscape installation and install without problems.

After the new plugin installed properly, launch Inkscape.
Under the Extensions-menu, you'll now find a menu section dedicated to multiple page documents (Extensions-> Pages):

Creating a document with multiple pages
Check the document properties (File-> Document Properties), for this tutorial it should be in standard A4 portrait format with mm as unit:

Choose Extensions-> Pages-> Create multi page document.

Confirm with "Apply".

Have a look at Inkscape's footer-menu: You should see #page1 there!

Create 3 more pages, using Extensions-> Pages-> Insert.

Choose 3 pages after the current page and confirm with "Apply":

The default shortcuts for navigating through the pages are:
- Ctrl + Alt + PgUp: move first page
- Ctrl + PgUp: move previous page
- Ctrl + PgDn: move next page
- Ctrl + Alt + PgDn: move last page
- Ctrl + Alt + Insert: insert new page.
If the shortcuts won't work on your computer, you can always navigate through the pages using Extensions-> Pages-> Go to...

Inkscape's footer-menu is always displaying the current page you're on:

Using a master page
A so called master page defines the look and feel and standard behavior that you want for all or some of the pages in your document.
In this example, I am going to create a master page with a document header used on all pages and regarding the bleed.
Adding Printing Marks
Select Extensions-> Pages-> Go to...-> Master page.

The footer menu displays now [#page0].

Activate the printing marks:

Use the Marks for Crop, Bleed, Registration and Color.
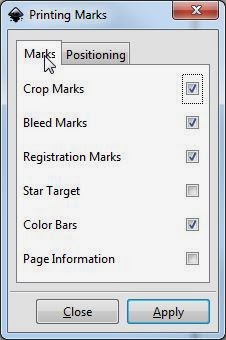
On the Positioning-tab, set Offset and Beed Margin to 6mm, a standard value suitable for most printing jobs (unless you agreed on different margins with your print service). Confirm with Apply.

Inkscape is always creating a new layer for printing marks. Unfortunately, the multiple pages plugin is only working with 1 layer only for each page - we need to collect the printing marks in our default layer.
Activate the layer-palette (Layer-> Layers):

In the layer-palette, unlock the Printing Marks layer:

Select the layer and copy everything on it using CTRL+A.

Use CTRL+x to erase everything from the Printing Marks layer, select the Master page layer and use Edit-> Paste In Place to transfer the contents of Printing Marks to the current layer.

Finally, select and delete the Printing Marks layer:

Creating a document header
On the active Master page layer use the Rectangle tool (F4) to create a colored area on top of the document. Make sure that the edges are reaching the defined trim and bleed marks. This will make sure that your document is printing correctly, with color right to the outer page margin!

You can use the text tool (F8) to create some dummy-text for the header.

Controlling the inner margins
For better layout, you álso can control the inner margins of your document. Select Extensions-> Pages-> Margins, in my example a standard 10 mm inner margin, and adjust your objects according to your layout.

Inserting page numbers
The Extension-> Pages menu allows you to use page numbers as well!
Extension-> Pages-> Master page-> Insert page numbers

Choose and apply an appropriate font size:

The other pages
All the changes, we made so far to our master page, should now be available on all of the other pages. If you navigate to the next page, you will see the master layout in action!
 |
| Page 1 with master head, printing marks, inner document margins and page number 1. |
You can now edit all pages separately. Just make sure you're working on the editable layer of a page:

Saving your multipage document
You can save the document as SVG file:

Exporting your multipage document as PDF (Windows)
You need to have an extra tool, if you want to export all pages from Inkscape, combine them into a single file and publish the whole document as PDF.
The open source weapon of choice would be PDFtk Free, a PDF toolkit which can be integrated into Inkscape.
Download PDFtk Free from http://www.pdflabs.com/tools/pdftk-the-pdf-toolkit/#download and run the installer.
Note: It is crucial that you add PDFtk to your environmental variables - otherwise Inkscape will not be able to execute PDFtk related commands!

You will need to restart Inkscape after the installation (make sure you saved your work  )!
)!
)!
After restarting and opening the multipage.svg again, choose Extensions-> Pages-> Export to PDF.

In PDFtk's export wizard, select the All pages option and: edit the tool path in the text box below!

pdftk is the command executing the program (if it's integrated into your environmental path), %i a parameter exporting ALL pages, the rest defines the output path for the resulting file (In my case the already existing tmp folder on my C: drive).
pdftk %i cat output c:\temp\output.pdf
Push the "Apply" button, let the program work.
Now you should find a multipage PDF document, named "output.pdf" in the specified folder.

Hope you enjoyed!
Thank you I needed this!
ReplyDeleteYou're welcome! Glad to hear it helped :-)
DeleteMany Thanks!!! It's a great work with a lot of screenshot. We need something like this.
ReplyDeleteHey, this is what I wanted ! Thanks a lot for this very detailed tutorial.
ReplyDeleteI have one issue with the first page. Lets say my first page is the cover of my ebook. So, I would like the page numbers to start from my second page. Do you know how to do this?
Hi Rodrigo: "Hotfix" to your page-numbering problem - create the cover as a separate inkscape document. You can join published PDF documents later with free tools like the PDF Creator (http://www.pdfforge.org/pdfcreator), for example.
DeleteSure, it will solve the problem. Thanks
DeleteThanks a lot. I cant wait for your next tutorial.
ReplyDeleteThanks a lot. I can't wait for your next tutorial. I have a question for you. What magazine publishing freeware would you recommend for a beginner? Something that will produce professional looking results and maybe some advice on photo editing for a magazine.
ReplyDeleteHi Tania: Thank you very much for commenting :-)! If you are into desktop publishing (DTP) and looking for an open source alternative to Adobe's InDesign I definitely would recommend "Scribus" (http://www.scribus.net/) - check it out & have fun!
Delete